Battle Goddess' gameplay takes place in five main areas: the town of Milphe, the world map, assorted dungeons, combat, and the menu screen.
Town[]
The main hub of travel in the town of Milphe is the town square; from here you can head to a variety of places (listed here in order as they appear on the menu):
- Bison's Hoof Inn - Come here to rest and save your game (more below).
- Militia Headquarters - Carla can be found here, if you're inclined to chat with her (and suffer a little heckling about your mission).
- Church - The local church of Elyun; come here to buy healing/holy items and chat up the resident priestess, Koun.
- Bazaar - Here you can visit the merchant Groc to buy and sell weapons, armor, and non-restorative items.
- Caravan - Visit the wandering gypsies here. Only appears when the caravan event begins, and only stays if you see it through within the time limit.
- Back Alleys - Not many people live back here; if you need to call up something big and nasty in order to beat it into submission, this is your place.
- Alicia's House - Come here to check in on Alicia and see how she's doing. Only available if you've rescued her.
- Worm Tunnels - Go here for a little extermination duty. Only available during the worm attack event.
- Leave Town - You won't track down the princess by lounging around town and hitting on the ladies. Takes you to the world map.
If you go into the Bison's Hoof, the third option will bring you back to your room. This gives you another menu:
- Look - Purely for flavor purposes.
- Leave the room
- Save
- Load
- Sleep - Restores Celica's health and abilities. Also advances the game clock, which may cause certain events to happen, and may also affect your success in sidequests that you haven't finished.
The World Map[]
Leaving town brings you to this screen. Initially only a couple of places are shown, but others will be added as you explore the mine and unlock more sidequests.
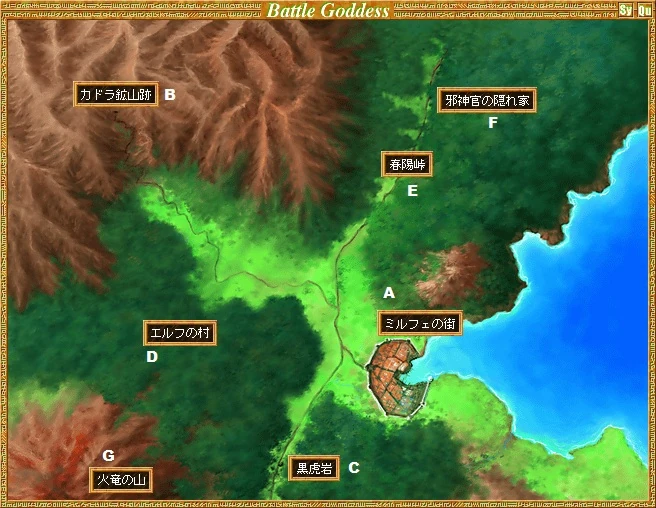
- A: Milphe - The town.
- B: The Cadora Mine - The target of your mission, and where you'll be spending most of your time.
- C: Black Tiger Rock - The hideout for a local bandit gang.
- D: Elf Village - Hidden in the forest.
- E: Springtime Pass - Used by caravans and travelers to reach the town.
- F: Corrupted Temple - A former site of worship for the Old Gods; it has long since been destroyed.
- G: Firedrake Mountain - An active volcano. Only crazed glory-seekers would come here to hunt anything.
The Dungeon Map[]
While exploring dungeons, the game cuts to a three-quarters view of the action.
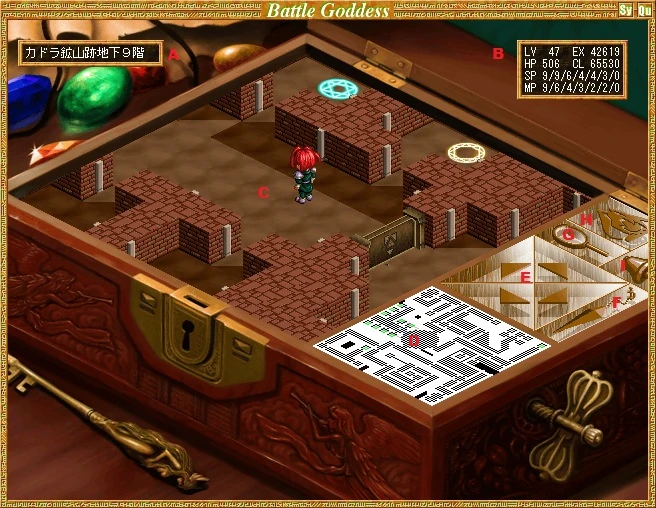
- A: The name of your current location, including the current floor if applicable.
- B: Celica's most important stats: his level, current experience, health, and cash on hand, as well as how many skills and spells remain for each level.
- C: The dungeon. Celica is always shown in the middle of the screen.
- D: Mini-map. Fills in as you explore. Green boxes denote exits (e.g. teleporters and stairways), while red boxes denote fixed hostile encounters.
- E: Arrows. Use these to move, or alternatively, use your arrow keys - or click and hold the left mouse button on the map.
- F: Earring of Flight. Use this to teleport instantly back to the world map. Does not work in all areas.
- G: Magnifying Glass. Investigate whatever is directly in front of Celica, be it a chest, a switch, a door, or a monster.
- H: Celica. Opens the menu.
- I: Bell. Instantly triggers a random battle.
Combat[]
Entering combat, be it a fixed battle or a random encounter, brings you to this screen.
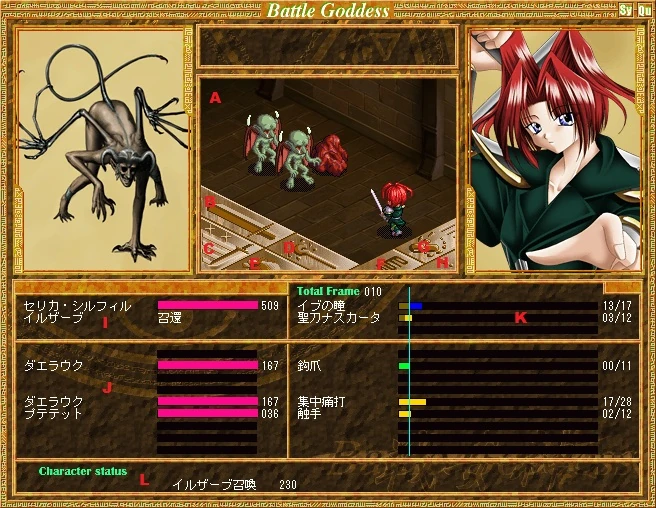
- A: The battlefield. The order shown on the screen corresponds with the HP bars listed under J, going left to right, then top to bottom as you move down the list (in the example shown above, the red slime is at the bottom of the list). Thus, the first enemy will always be the one furthest from Celica and on the left, while the last will always be the one closest and on the right. Keeping this in mind can be helpful if you need to pick off a particular enemy before it uses a dangerous attack.
- B: Sword. Celica's basic attack, made with his equipped weapon.
- C: Sword in motion. Uses one of Celica's sword techniques, which can provide passive buffs or attack the enemy directly.
- D: Staff. Uses one of Celica's spells.
- E: Bag. Uses one of the items from Celica's inventory.
- F: Auto. Causes Celica to automatically use his basic attack at all times. He will start with the last enemy on the list, focus on it until it's dead, then move on to the next highest. Lasts until the fight ends, or until cancelled.
- G: Running man. Attempt to flee. Frequently low chance of success; you'll often get done faster (and sustain less damage) simply by slugging it out.
- H: Exclamation point. Cancels the currently-readied attack (and auto mode, if it's active), allowing you to immediately issue a different command, assuming Celica isn't on cooldown after casting a spell.
- I: Your party. Celica is listed first, along with his health; the remaining space is for your companions, who may be either fellow adventurers or summoned familiars. Celica's companions have no health, cannot be targeted by enemies, and cannot be killed. In combat, they will randomly choose from their repertoire of abilities and spells whenever their turn comes up. If using a single-target attack, they will always attack the last enemy on the list.
- J: The enemies' names and health bars. See A above for an explanation of how the list corresponds to the image of the battlefield.
- K: The Frame counter. Each creature in the battle (including Celica and his companions) has a meter showing how long it will take to make their attack. When an attack is selected, a yellow bar appears. The vertical line indicates the current Frame, and moves to the right as time passes. When it reaches the end of a yellow bar, the bar turns green (along with any other attacks happening at the same time); these attacks are then resolved in order from top to bottom, beginning with Celica. Magic attacks are an exception to this rule; the spell is cast immediately, after which a cooldown period must pass (represented by a blue bar) before the caster can choose another attack. Since Celica gets to choose another target as soon as his attack lands, this makes it possible for him to kill one enemy with a physical attack, then use a spell to interrupt another enemy with a green bar before it can move. Note this can also result in unexpectedly high damage from bosses when it happens in reverse.
- L: Status. Any temporary effects are listed here along with the time remaining until they expire.
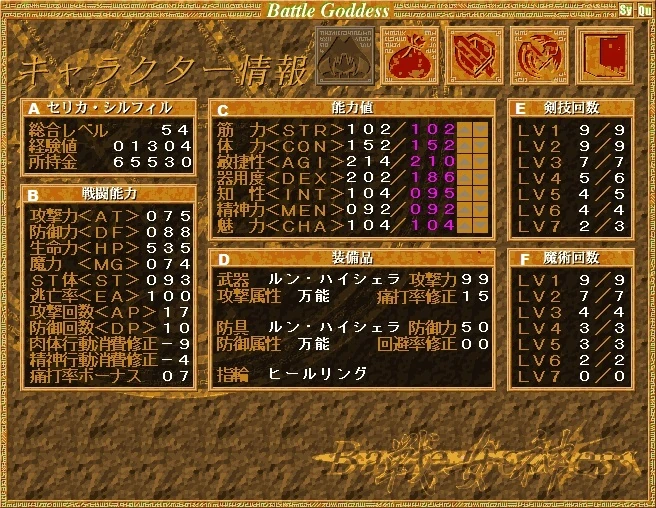
Menu[]
Hitting the button with a picture of Celica will bring you to this screen, which allows you to distribute your points and upgrade your character, as well as using magic or items out of combat.
At the upper-right are five buttons:
- Celica - Takes you to the menu in the screenshot, where you can spend your experience points to raise your abilities.
- Bag - Takes you to the item list.
- Sword and Shield - Takes you to the equipment menu, where you can change your weapon, armor, and accessory.
- Sword and Staff - Takes you to the special skills menu, where you can use non-combat spells and view your sword techniques.
- Door - Returns you to the dungeon map.
The six panes on the character screen display information about Celica.
- A: Summary. Shows Celica's character level, total experience, and cash on hand. Note that the level only increases when you spend experience points, and that both money and experience are capped at 65530 - so spend your experience regularly to keep any from going to waste.
- B: Battle statistics. The main stats you'll be interested in here are AP and DP your attack and defense counters, which are the main factor in determining how you stack up against an opponent.
- C: Base statistics. These are the abilities you spend your experience to upgrade, which will eventually affect your other stats.
- STR: Strength. Mainly influences your attack strength (not your AP) and health.
- CON: Constitution. Greatly increases your total health pool.
- AGI: Agility. Increases your defense counter and sword skills.
- DEX: Dexterity. Increases your attack counter and sword skills; also reduces the time your attacks take.
- INT: Intellect. Increases your magical power and number of spells; also reduces the cooldown after casting spells.
- MEN: Mental strength. Increases your magical power and number of spells.
- CHA: Charisma. Has a bit of an effect on everything, but primarily seems to increase evasion.
- Use the arrow buttons to purchase upgrades to your stats. Your purchases will not become final until after you leave the menu screen.
- D: Your current equipment and its ratings.
- E: Your available sword techniques for each level.
- F: Your available spells for each level.
| |||||||||||||||||||||||||||||||||||||